How to Use Smart Tags in OptinMonster
Do you want to know How to Use Smart Tags in OptinMonster? Do you want to learn how best you can utilize the smart tags feature? Then you should never miss reading any part of this article. Before we jump in, you should learn what smart tags are in the context of OptinMonster. Follow this link to learn more about OptinMonster.

Smart Tags in OptinMonster
Smart Tags in OptinMonster are dynamic text that you can insert into your marketing campaigns. These smart tags help create customized text messages for your campaigns. You would be able to send personalized and tailored messages to different audience and clients based on their data. A recent study shows that sending personalized messages increases the chance of more conversions. For example, it is possible to create dynamic content that shows the user’s name, the current date and time etc within a message. You could surprise your target audience with a personal touch.
More importantly, this helps reduce shopping cart abandonment in the case of e-commerce sites.
There are many situations where you might want to use smart tags. Let’s say for example:
- You might want to greet your old client who has revisited your website with his data such as his name, location, the product that was last purchased by him and so on.
- You might want to place a dynamic count down date and time for offers.
- You might want to display a custom contact form based on different locations.
And yet there might be many other situations where you might want to use smart tags and automate things.

How to add or create Smart Tags in OptinMonster?
You could use the feature of smart tags at the time of creating campaigns for your online marketing. There are usually two things that you could do, you may either use the built-in smart tags or create your custom tags and use them.
Creating a smart tag in OptinMonster is quite an easy job but before that let me remind you that this feature requires a premium subscription. OptinMonster is available for major CMS applications such as WordPress, Joomla, Drupal, Magento, Squarespace, Shopify, Woocommerce etc. Also, it’s available for other platforms such as blogger, Weebly, Tumblr etc. You could grab exciting offers on OptinMonster subscription via this link.
The smart tags could be added from within the campaign builder as shown in the image below.
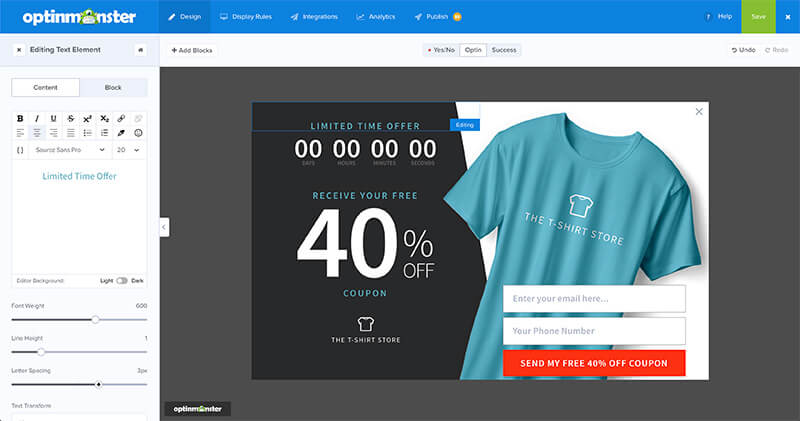
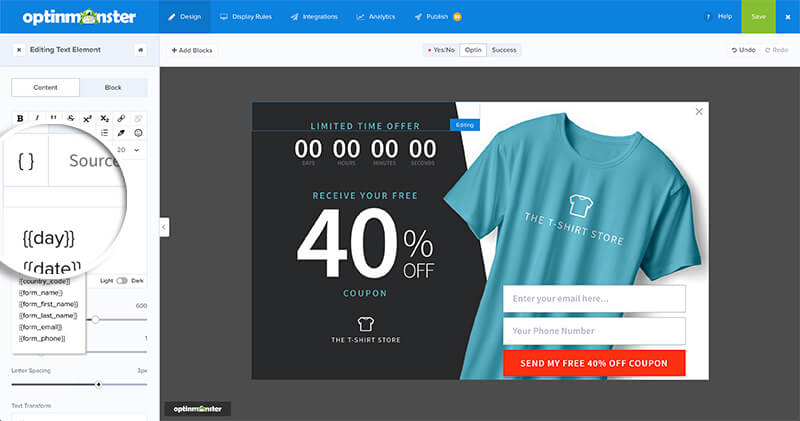
First, you will need to select text placeholders and make sure that you are in editing mode. Then click the cursor where you want to insert the smart tag and then click on the curly braces button. This reveals a list of in-built smart tags. You may click and select the one that is required. Please refer to the image below:
Later you might also specify a default value if you wish and click on the Save button. The smart tags would be replaced with respective dynamic values as soon as the campaign goes live.
Formatting the smart tags
There are a variety of smart tags for various purposes. As a general thumb rule, any smart tag should be enclosed within curly braces. You should insert two opening curly braces at the beginning and two curly braces at the ending as well. If you would like to specify a default value, you may do so by adding a pipeline character and writing the default text after it as shown below:
{{SMART_TAG_NAME|DEFAULT_TEXT}}
Some of the built-in smart tags that you could use in your campaigns
{{form_first_name}}, {{form_email}}, {{form_phone}}, {{day}}, {{month}}, {{year}}, {{date}}, {{city}}, {{state}}, {{postal_code}}, {{country}}, {{page_url}}, {{referrer_url}}, {{pages_visited}}, {{time_on_site}}, {{visit_timestamp}}, {{page_title}}, {{campaign_name}} etc and many others.
Besides using built-in smarts tags you might also create custom smart tags as per your requirement.
Final Thoughts and Conclusions
OptinMonster is a great tool that you can use to convert your website, visitors, into potential customers. OptinMonster facilitates lightbox popups, floating bars, scroll boxes, gamified wheels, page-level targeting, exit intent detection, geo-targeting and a lot of other tools that help you boost your website traffic and increase sales. These tools surely help you better engage your website visitors and reduce bounce rate. Ultimately it makes your website more interesting and lively.
Besides the available many tools and features of OptinMonster, I wanted to highlight the Smart Tags feature in this article. Smart tags help you create campaigns with personalized dynamic content based on specific user interest. Most of the businesses today are losing their business only because of not using the right online marketing tool. Also, they are losing conversions just because they couldn’t properly address their website visitors with a personal touch. Giving importance to the user’s interest creates more confidence in them and influences them to subscribe or buy your products or services. So you should understand that the key here is personal attention. Every business surely needs a super-smart tool to plan, operate and manage online marketing today. And OptinMonster is the best lead conversion tool that I would like to recommend. This is one tool with many options that many other software or apps often fail to fulfil.
Follow this link to learn more about OptinMonster.
I hope that this article on How to Use Smart Tags in OptinMonster is more beneficial for website owners. Keep coming to my site to learn more similar things.
Similar Articles:
- How To Automate Your Work With Zapier And WPForms
- Embed Calculator on Website and Increase Website Traffic Fast
- How to Quickly Install Google Analytics Global Site Tag in WordPress (gtag.js)
- Best WordPress SMTP plugin – How to send Email through SMTP in WordPress
- Best way to share WordPress analytics reports with Google Analytics
- Best conversational forms for WordPress sites
- Best Examples to Create Order Form in WordPress using WPForms Plugin
- MS Word Shortcut Keys PDF - October 13, 2024
- What is MS Word and its Features PDF - October 10, 2024
- 10 Free Word Templates for Every Need - October 10, 2024